The fusion of technology and home decor has reached new heights with smart mirrors with LED lighting becoming an increasingly popular choice for modern homes. These innovative fixtures not only serve the practical purpose of reflection but also incorporate advanced features like built-in lighting, touch controls, and even digital displays. Whether you're renovating your bathroom or creating a sophisticated dressing area, installing a smart mirror with LED lighting can dramatically enhance both the functionality and ambiance of your space.
Before diving into the installation process, it's important to understand that a smart mirror with LED lighting represents more than just a technological upgrade - it's an investment in your daily routine and home's aesthetic appeal. With proper installation, these mirrors can serve as both practical tools and stunning focal points, offering perfect illumination for grooming tasks while creating an atmosphere of luxury and sophistication.
Success in installing your smart mirror with LED lighting begins with having the right equipment at hand. You'll need a power drill, level, measuring tape, pencil, wall anchors, mounting brackets, and appropriate screws. For electrical work, prepare wire strippers, electrical tape, and a voltage tester. Don't forget safety equipment like work gloves and safety glasses. Having all tools organized before starting will ensure a smooth installation process.
Additionally, confirm that you have all the components that came with your smart mirror package. This typically includes the mirror itself, LED controller, mounting hardware, and any additional features like speakers or touch sensors. Take inventory and familiarize yourself with each component's purpose before proceeding.
Choosing the optimal position for your smart mirror requires careful consideration of several factors. First, ensure the selected wall can support the mirror's weight and has accessible power sources nearby. Measure the space carefully, accounting for any obstacles like light switches or outlets. Consider the room's traffic flow and natural light sources to maximize the mirror's functionality.
The height of installation is crucial for both practical use and aesthetic appeal. Generally, the mirror's center should be at eye level for the average user, typically around 57-65 inches from the floor. Mark your measurements clearly on the wall and use a level to ensure perfect alignment.
The electrical setup for your smart mirror with LED lighting demands careful attention to safety and local building codes. If you're not confident in handling electrical work, it's wise to consult a licensed electrician. The mirror will require a steady power supply, typically 120V AC, which should be properly grounded and connected to a GFCI outlet if installed in a bathroom.
Consider installing a dedicated circuit for your smart mirror, especially if it includes multiple features like heated demisting or built-in speakers. This ensures stable power delivery and prevents overloading existing circuits. Plan the wiring route carefully to maintain a clean, professional appearance.
Modern smart mirrors with LED lighting often come with sophisticated control systems. The LED controller needs to be installed in an accessible location, yet discretely hidden from view. Most systems offer multiple lighting modes, brightness adjustment, and color temperature control. Ensure all connections between the controller and LED strips are secure and properly insulated.
Take time to test the controller's functionality before completing the installation. This includes verifying all lighting modes, checking for any flickering or dead spots, and ensuring the control interface responds correctly to commands.
Proper wall preparation is crucial for a secure installation. Begin by locating wall studs using a stud finder, marking their positions clearly. If mounting on drywall between studs, use appropriate wall anchors rated for the mirror's weight. Clean the wall surface thoroughly and repair any imperfections that might affect the mounting.
Install mounting brackets according to the manufacturer's specifications, ensuring they're perfectly level. Double-check all measurements and use a helper to verify the positioning. Some smart mirrors require special mounting systems to accommodate their electronic components, so follow the included instructions carefully.
The actual mounting of your smart mirror with LED lighting requires at least two people to ensure safe handling. Carefully lift the mirror into position, aligning it with the mounted brackets. Before releasing the full weight onto the brackets, verify that all mounting points are properly engaged and the mirror is level.
Once positioned, secure any safety locks or additional mounting hardware included with your mirror. This secondary securing system prevents accidental displacement and ensures long-term stability. Take a final measurement to confirm the mirror hasn't shifted during mounting.
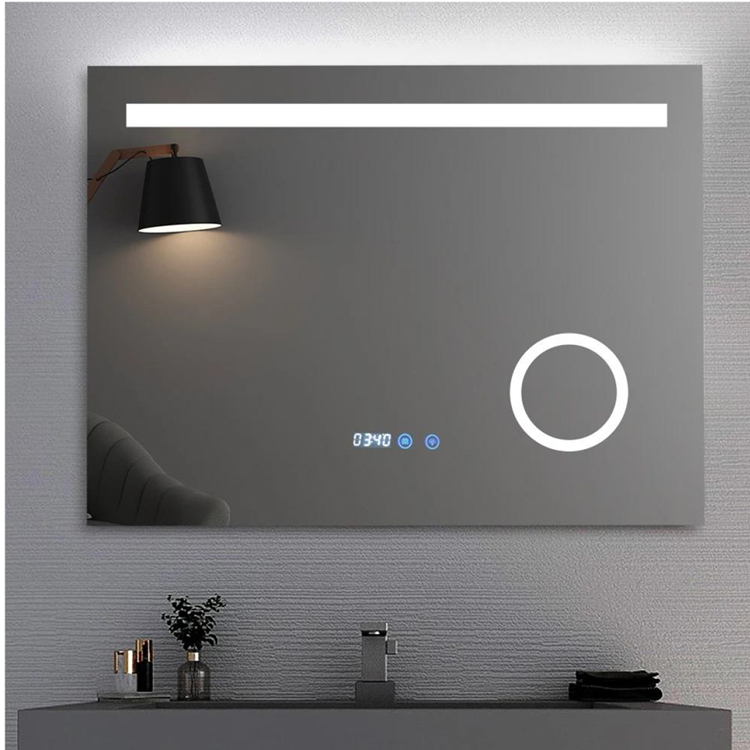
After installation, conduct a comprehensive test of all features. Verify that the LED lighting functions properly across all settings and modes. Check any smart features like touch controls, voice commands, or bluetooth connectivity. Pay attention to the uniformity of the LED lighting and ensure there are no dark spots or inconsistencies.
Test any additional features your smart mirror may include, such as temperature displays, clock functions, or integrated speakers. This is also the time to sync any compatible smart home devices or mobile apps with your mirror's system.
Fine-tune the mirror's settings to optimize its performance for your specific needs. Adjust the LED brightness levels for different times of day and activities. If your mirror includes adjustable color temperature, set presets for various scenarios like morning grooming or evening ambiance.
Take time to calibrate any motion sensors or touch-sensitive areas for optimal responsiveness. Some smart mirrors allow for customization of display information or interface layouts - configure these according to your preferences.
The installation process typically takes between 2-4 hours for someone with basic DIY experience. This timeframe can vary depending on the complexity of the electrical work required and whether any special mounting considerations are needed. Professional installation may be completed more quickly.
Regular maintenance includes cleaning the mirror surface with appropriate glass cleaner, checking electrical connections periodically, and updating any software or firmware as recommended by the manufacturer. LED lights typically last 50,000+ hours, so replacement is rarely needed with normal use.
Yes, these mirrors can be installed in bathrooms, but they must be properly rated for humid environments and connected to GFCI-protected circuits. Choose a model specifically designed for bathroom use with appropriate IP ratings for moisture resistance. Some models include anti-fog features for added convenience.

ALWAYS FIGHT FOR BETTER SOLUTIONS TO YOUR BUSINESS.
Copyright © 2026 Chaoan Meizhi Ceramics Co., Ltd.
 EN
EN
 AR
AR BG
BG NL
NL FI
FI FR
FR DE
DE EL
EL IT
IT NO
NO PL
PL PT
PT RO
RO RU
RU ES
ES SV
SV TL
TL LV
LV LT
LT SR
SR UK
UK VI
VI SQ
SQ HU
HU MT
MT TH
TH AF
AF MS
MS KA
KA